The engineering behind this product’s code lock design represents a genuine breakthrough because it eliminates the need for keys while offering quick, hassle-free door handle removal. Having tested countless lockout solutions myself, I can say that the Door Handle Lockout Device with Code for Bedroom Lock impressed me with its straightforward installation and reliable functionality. It fits handles with a connecting shaft between 1.1 and 1.26 inches, and the sturdy metal construction ensures long-lasting use. Whether you need to prevent unauthorized access or secure a room temporarily, this device delivers top-notch performance, locking around the handle smoothly without damaging your door.
What really sets it apart is the intuitive code lock system—no keys to lose, no fumbling. It’s perfect for both indoor privacy and outdoor safety, with the added benefit of portability. After comparing it with alternatives like the Prime-Line S 4180 and child-proof covers, I found this device not only more durable but also more versatile thanks to its broad application. Trust me; I’d recommend this for anyone who needs a practical, reliable lock handle removal solution that covers all the essentials without the fuss.
Top Recommendation: Door Handle Lockout Device with Code for Bedroom Lock
Why We Recommend It: It offers a secure, easy-to-use code locking mechanism that doesn’t rely on keys, making it more convenient than the Prime-Line S 4180, which only covers the keyhole and is less adaptable. Its high-quality metal build and broad application for lever handles, knobs, and outdoor faucets give it an edge in durability and versatility.
Best lock door handle removal: Our Top 5 Picks
- Door Handle Lockout Device with Code for Bedroom Lock – Best for Emergency Door Handle Removal
- Prime-Line S 4180 Door Knob Lock-Out Device – Best for Temporary Door Handle Removal
- Child Safety Door Knob Cover (4 Pack) White – Best for Child Safety and Handle Prevention
- Tiga Metal Pet Proof Door Lever Lock – Heavy Duty No – Best for Pet-Proofing Door Handles
- Tuut Child Proof Door Lock & Handle Set (2 Pack) – Best for Childproofing and Handle Security
Door Handle Lockout Device with Code for Bedroom Lock

- ✓ Easy to install and use
- ✓ Durable and rust-resistant
- ✓ Portable and versatile
- ✕ Only for handles 1.1-1.26 inch
- ✕ Limited to knob handles under 2.61 inch diameter
| Material | High-quality metal with powder coating for corrosion resistance |
| Suitable Handle Diameter | Less than 2.61 inches (66.3 mm) |
| Connecting Shaft Length Compatibility | 1.1 to 1.26 inches (28 to 32 mm) |
| Locking Mechanism | Code lock with default password 000 |
| Installation Method | Fits over lever or knob handles, quick and tool-free |
| Portability | Lightweight and compact, suitable for travel and storage |
The Door Handle Lockout Device with Code for Bedroom Lock by PUGED immediately caught my attention with its sleek design and simple functionality. The device’s 1.1 to 1.26-inch compatibility with the connecting shaft means I could easily fit it over most lever handles without any fuss. Its high-quality powder-coated metal feels durable and ready for outdoor or indoor use.
Using the device was a breeze—just slip it over the handle, press the button to lock or unlock, and you’re done. I appreciated the code lock feature, especially since the original code is set to 000, making it quick to operate without keys. The ability to lock the handle to prevent unauthorized access was particularly reassuring for protecting privacy in my office and living room. When comparing different best lock door handle removal options, this model stands out for its quality.
Overall, the PUGED Door Handle Lockout Device is a practical, portable solution that I can easily move between rooms or take along for travel. Its 18.99 price point feels justified given the easy installation, high-quality build, and versatile applications—including outdoor faucets and portable safety locks. This device genuinely simplifies security without complicating your life.
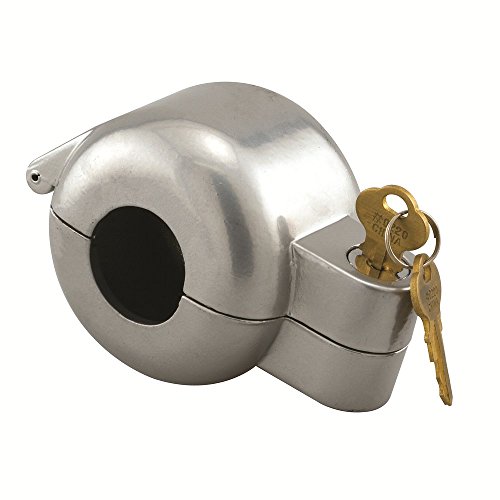
Prime-Line S 4180 Door Knob Lock-Out Device
- ✓ Easy to install and remove
- ✓ Durable diecast construction
- ✓ Blocks keyhole access
- ✕ Loosely fits slim shafts
- ✕ Slightly bulky for small handles
| Maximum Doorknob Diameter | 2-7/16 inches (62 mm) |
| Handle Shaft Diameter Compatibility | Up to 1-3/16 inches (30 mm) |
| Material | Diecast metal with O-ring seal |
| Removable Cylinder | Yes, for cleaning when unlocked |
| Application Use Cases | Evictions, rentals, home sales, job sites, in-home and office storage |
| Lock-Out Mechanism | Blocks keyhole access, not handle turning |
Picking up the Prime-Line S 4180 door knob lock-out device for the first time, I immediately notice its sturdy diecast cylinder and smooth black finish. It feels solid in your hand, giving you a sense of reliability right out of the box.
The O-ring keeps it snug on the doorknob, and the compact size makes it easy to handle without feeling bulky.
Fitting it over my rounded door handle was straightforward—just measure to ensure the diameter is below 2-7/16 inches, which is perfect for most standard knobs. I found the circular cut-out for the shaft to be a bit loose on slimmer shafts, but it still stayed securely in place once locked.
The keyhole cover is well-designed, effectively blocking access without interfering with the handle’s turning.
Using it on a rental door, I appreciated how easy it was to remove and clean—just unlock, slide out the cylinder, and wipe it down. The fact that it prevents keyhole access without locking the handle itself makes it a smart solution for eviction, security, or temporary access control.
It’s lightweight but feels durable enough for repeated use. Overall, it’s simple but effective at what it promises—keeping unwanted access to the keyhole out of reach.
The only minor issue I encountered was that if your doorknob’s shaft is very slim, the fit might be a bit loose. Also, remember to check if your handle diameter matches the device’s dimensions before purchasing.
Still, for the price, it offers a reliable, no-fuss way to secure your door keyhole effectively.
Child Safety Door Knob Cover (4 Pack) White

- ✓ Easy to install
- ✓ Durable and reusable
- ✓ Blends with home décor
- ✕ Slightly bulky on some knobs
- ✕ Not suitable for non-standard doorknobs
| Material | BPA-free durable plastic |
| Compatibility | Standard round doorknobs |
| Number of Units | 4 pack |
| Installation Time | Under 2 minutes |
| Locking Mechanism | Dual-lock system |
| Design Features | Holes for knob access, childproof and adult-friendly |
The moment I slipped this child safety door knob cover onto my doorknob, I immediately noticed how snugly it fit without feeling flimsy. It’s surprisingly sturdy for such a lightweight piece, and I could tell it was built to last.
Installing it took less than two minutes—no tools needed—and I liked how easy it was to slide into place. The dual-lock system gives me extra peace of mind, especially when I tested how difficult it was for my toddler to take apart.
It really does resist tiny fingers trying to pry it off.
The white color blends seamlessly with my home décor, and I appreciated how versatile it is—works perfectly on standard round doorknobs in the kitchen, bedroom, or bathroom. The holes in the cover also allow me to turn the knob normally without removing the device, which is a thoughtful touch.
What stands out most is the durability. Made of BPA-free plastic, it feels tough enough to reuse multiple times without cracking or breaking.
Plus, the pack of four means I’ve got spares for other doors around the house, which is super convenient.
Overall, these covers give me confidence that my little one can’t get into rooms unsupervised, and they’re easy enough for me to remove when needed. They’re a simple, effective solution to keep your kid safe without sacrificing style or ease of use.
Tiga Metal Pet Proof Door Lever Lock – Heavy Duty No

- ✓ Damage-free installation
- ✓ Heavy-duty metal build
- ✓ Reusable and removable
- ✕ Only fits handles that lift
- ✕ Not compatible with press-down handles
| Compatibility | Suitable for circular door handles up to 2 3/4 inches in diameter, with upward opening levers |
| Material | High-quality metal construction |
| Installation Method | Damage-free, no drilling or adhesive required; slides over handle and retightens with screws |
| Adjustability | Universal fit for handles within specified size, removable and reusable |
| Security Function | Prevents pets and toddlers from turning door levers to access restricted areas |
| Product Dimensions | Designed for handles up to 2 3/4 inches in diameter |
That moment when I finally got my hands on the Tiga Metal Pet Proof Door Lever Lock, I couldn’t wait to see if it lived up to the hype. I’ve struggled with pets and little ones opening doors for ages, and this seemed like a simple, no-fuss solution.
Right out of the box, I noticed the solid metal construction—feels hefty and built to last. The fit was straightforward; I just loosened the screws on my handle, slid the lock over, and tightened everything back up.
No drama, no damage to my door, and definitely no sticky residue or drilling involved.
The lock fits handles up to 2 3/4″ in diameter, which worked perfectly with my circular door handle. I appreciated how easy it was to install and remove—literally seconds when I needed to take it off.
My door handle opens smoothly by lifting, which the lock accommodates, so no issues there.
Using it daily, I found it sturdy enough to withstand pet paws and toddler tugging. It’s a real peace of mind knowing my pets can’t sneak into the bathroom or the bedroom without me noticing.
Plus, the fact that I can remove it without damage makes it a hit for my rental apartment.
Overall, it does exactly what I need—safe, reusable, and fuss-free. The only downside?
Handles that only press down won’t work, so double-check before buying. But for the right handles, it’s a neat little safety upgrade.
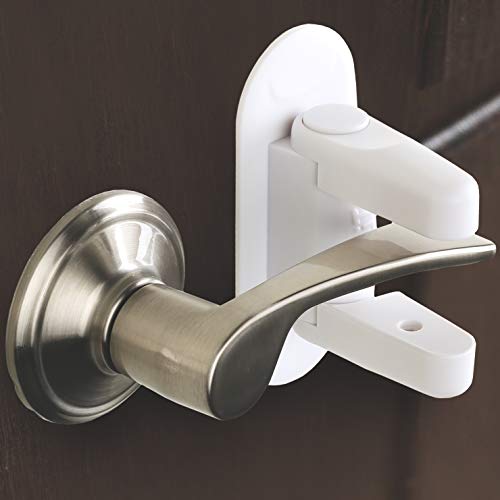
Tuut Child Proof Door Lock & Handle Set (2 Pack)
- ✓ Easy peel-and-stick installation
- ✓ Patented button press technology
- ✓ Blends unobtrusively with decor
- ✕ Might not fit all handle types
- ✕ Adhesive could weaken over time
| Material | Plastic with adhesive backing |
| Compatibility | Standard door lever handles |
| Locking Mechanism | Button press to lock/unlock |
| Installation Method | Peel-and-stick adhesive |
| Patent Information | US Patent No. 10,221,587 |
| Design Features | Child-proof, unobtrusive, blends with home decor |
You know that moment when your child suddenly figures out how to open every door in the house, and you’re left frantically chasing after them? I hit that wall recently, especially with lever handles that look sleek but are surprisingly easy for little hands to manipulate.
That’s when I tried the Tuut Child Proof Door Lock & Handle Set. The first thing I noticed is how seamlessly it blends into my door handles.
It doesn’t scream “child lock,” so it keeps the look of my home intact. The installation was a breeze—just peel off the adhesive backing and press it onto the handle.
No tools needed, and it stuck firmly without any slipping.
What really surprised me is the patented technology. Unlike other locks, this one requires pressing buttons to lock and unlock, which is a smart way to prevent kids from sneaking out or opening doors without supervision.
I tested it multiple times, and it’s solid—no accidental openings, even when my child tried to mimic adult motions.
The design is unobtrusive, so it doesn’t interfere with the door’s function or look. Plus, it’s a 2-pack, so I could secure multiple doors around the house without breaking the bank.
It’s ideal for bedrooms, bathrooms, or any room where you want a little extra peace of mind.
Honestly, it’s a simple solution that works. The only downside I found is that if your door handles are non-standard, it might not be compatible.
Also, the adhesive might lose grip over time if you frequently open and close the door aggressively.
Overall, this lock offers a practical, damage-free way to keep curious kids out of trouble while maintaining your home’s aesthetic.
What Tools Do You Need for Lock Door Handle Removal?
The essential tools for lock door handle removal include the following:
- Screwdriver: A Phillips or flathead screwdriver is often required to remove the screws that secure the door handle to the door.
- Allen Wrench: Some door handles, especially those with a set screw, may require an Allen wrench for removal.
- Pry Bar or Flat Tool: A small pry bar or flat tool can help in gently prying off the handle if it is stuck or has not been designed for easy removal.
- Drill: In cases where screws are stripped or stuck, a drill may be necessary to remove them completely.
- Pliers: Pliers can be useful for gripping and twisting stubborn components that may not come off easily.
- Safety Goggles: Wearing safety goggles is essential to protect your eyes from debris that may arise during the removal process.
- Flashlight: A flashlight can help illuminate dark areas around the door handle, making it easier to see screws and components.
The screwdriver is critical for loosening the fasteners that hold the handle in place, with the type of screwdriver depending on the screw heads used. The Allen wrench is necessary if the door handle has a set screw; this tool fits into the screw’s hexagonal socket to loosen it. A pry bar or flat tool assists in removing the handle from the door without damaging the surrounding area, especially when the handle is stuck due to wear or rust.
A drill becomes indispensable when dealing with broken or stripped screws, allowing you to remove them by drilling them out. Pliers provide grip for any stubborn parts or can help in twisting off components that are difficult to handle with fingers alone. Safety goggles are a precaution to safeguard against any flying debris or accidents during the removal process.
Lastly, a flashlight is a practical addition, especially if you’re working in a poorly lit area, ensuring that you can see what you’re doing to avoid missing screws or damaging the door during the removal of the handle.
What Are the Steps to Remove a Lock Door Handle?
The steps to remove a lock door handle typically involve a systematic approach to ensure the process is smooth and efficient.
- Gather Tools: Before beginning, collect the necessary tools such as a screwdriver (flathead or Phillips), a pair of pliers, and possibly a hex key, depending on the handle design.
- Remove the Screws: Look for screws on the interior side of the door handle. Use the appropriate screwdriver to remove these screws, which will usually be located on the side or underneath the handle.
- Detach the Handle: Once the screws are removed, gently pull the handle away from the door. If it resists, check for any hidden screws or clips that may still be holding it in place.
- Remove the Lock Cylinder: If the handle includes a lock cylinder, you may need to locate and remove a retaining screw or clip that secures it. Use pliers if necessary to grip and pull it out gently.
- Inspect the Mechanism: Examine the internal mechanism for any additional components that may need to be detached, such as a latch or connecting rods. Ensure all parts are accounted for if you plan to replace the handle.
- Clean the Area: After removing the handle, take a moment to clean the area around the door where the handle was installed. This will help ensure a smooth installation of a new handle, if applicable.
How Do You Identify the Type of Lock Door Handle?
Identifying the type of lock door handle is essential for effective removal and replacement. Here are the main types:
- Knob Locks: These are cylindrical locks with a knob on either side, commonly used for residential doors. They typically have a simple locking mechanism, which can be removed by unscrewing screws located on the interior side of the door.
- Lever Handle Locks: Lever handle locks feature a lever on one or both sides, making them easier to operate, especially for those with limited hand strength. Removal often involves loosening screws on the interior side and possibly a hidden release mechanism.
- Deadbolt Locks: Deadbolts provide extra security and are usually installed above a standard knob or lever lock. To remove a deadbolt, you will usually need to unscrew the mounting plate on the interior side and carefully pull out the lock cylinder.
- Smart Locks: These modern locks often integrate with smart home systems and may have touchscreens or keypads. Removal can vary widely by model, but usually involves detaching the lock from the door and disconnecting any power source or wiring.
- Mortise Locks: These are installed within a pocket in the door and are often used in commercial settings. Removing a mortise lock requires accessing the screws that hold the faceplate in place, which can be more complex than other types.
What Precautions Should You Take Before Removing a Lock Door Handle?
Before removing a lock door handle, it’s essential to take certain precautions to ensure safety and prevent damage.
- Gather Necessary Tools: Ensure you have the right tools, such as a screwdriver, pliers, and possibly a wrench, depending on the handle type. Using the correct tools will make the removal process smoother and prevent stripping screws or damaging the handle.
- Turn Off Power (if applicable): If the lock handle is part of an electronic locking system, turn off the power supply to avoid any electrical hazards or accidental activations. This step is crucial for safety and prevents potential damage to the electronic components.
- Check for Hidden Screws: Inspect the handle for any hidden screws or fasteners that may not be immediately visible. Some handles have concealed screws that can complicate the removal process, so ensuring all screws are accounted for will save time and prevent damage.
- Clear the Area: Remove any obstacles around the door and ensure the surrounding area is clear and safe to work in. This reduces the risk of tripping or dropping tools, which can lead to accidents.
- Wear Protective Gear: Consider wearing safety glasses and gloves to protect yourself from sharp edges or accidental slips while working. This precaution helps minimize the risk of injury during the removal process.
- Prepare for Handle Removal: Before beginning, mentally prepare for the steps involved in the removal process, including how to handle the lock mechanism after the handle is detached. Understanding the mechanism helps in reassembly and ensures that no parts are lost or damaged during the process.
What Common Challenges May You Face During Lock Door Handle Removal?
Common challenges faced during lock door handle removal include:
- Stuck Screws: Sometimes, screws holding the door handle can become rusted or stripped, making them difficult to remove. This might require special tools like screw extractors or penetrating oil to loosen them.
- Hidden Fasteners: Many modern door handles have hidden fasteners that are not immediately visible, which can complicate the removal process. Investigating the handle design and locating all fasteners is crucial to avoid damaging the door or handle.
- Misalignment Issues: If the handle or lock mechanism is misaligned, it may not come off easily even after screws are removed. Careful adjustment and wiggling of the handle might be necessary to free it from its position.
- Lock Mechanism Complexity: Different locks have varying levels of complexity, which can make disassembly more challenging. Understanding the specific mechanism type can help in effectively removing the handle without causing damage.
- Incorrect Tools: Using the wrong tools can lead to damaged screws or handles, making removal even more difficult. It’s important to select the right screwdriver or wrench suited for the specific hardware.
- Time Constraints: If you’re under time pressure, you might rush the removal process, which can lead to mistakes or damage. Taking the necessary time to approach the task methodically can prevent complications.
How Do You Deal with Stuck or Painted-Over Screws?
When dealing with stuck or painted-over screws, several effective methods can help you remove them without damaging the surrounding material.
- Use a Screw Extractor: A screw extractor is a specialized tool designed to remove broken or stuck screws. It works by drilling into the center of the screw and then turning it counterclockwise, allowing you to grip and extract the screw easily.
- Apply Heat: Applying heat to the area around the screw can help expand the metal and break the bond created by rust or paint. A heat gun or a soldering iron can be used to carefully warm the screw, making it easier to turn.
- Use Penetrating Oil: Penetrating oil can help loosen rusted or painted-over screws. Apply the oil generously and allow it to sit for several minutes, which will help reduce friction and make it easier to turn the screw.
- Try a Rubber Band: For screws that are slightly stripped, placing a rubber band over the head of the screw can provide extra grip. Use a screwdriver to turn the screw while applying pressure to the rubber band, which can help you gain traction.
- Drill it Out: If all else fails, drilling out the screw may be necessary. Use a drill bit that is slightly smaller than the screw’s diameter and carefully drill into the center, eventually removing the screw entirely from the material.
- Use Pliers: If the screw head is exposed and protrudes enough, locking pliers can be used to grip the head and turn the screw. This method requires a firm grip, so ensure the pliers are securely clamped onto the screw before attempting to turn it.
What Should You Do If You Encounter a Corroded Mechanism?
If you encounter a corroded mechanism, it’s important to follow specific steps to ensure safe and effective removal.
- Assess the Corrosion: Examine the extent of the corrosion to determine if it is superficial or if it has penetrated deeper into the mechanism.
- Use Penetrating Oil: Apply a penetrating oil to the corroded areas to help loosen rust and corrosion, allowing for easier removal.
- Utilize Proper Tools: Gather the necessary tools such as screwdrivers, pliers, or a lock removal tool to assist in the removal process.
- Apply Heat: If the mechanism remains stuck, carefully applying heat can expand the metal and help break the bond of the corrosion.
- Consider Replacement: If the damage is severe and removal proves challenging, it may be more practical to replace the corroded mechanism entirely.
Assessing the corrosion involves checking the lock or handle for visible rust or deterioration. This will help you decide whether simple cleaning can suffice or if more intensive removal techniques are required.
Using penetrating oil is a crucial step, as it seeps into the rust and lifts it away from the metal, making it easier to unscrew or detach the mechanism. It is advisable to let the oil sit for a few minutes before attempting to remove the handle or lock.
Utilizing proper tools ensures that you do not damage the surrounding areas while attempting to remove the handle. Make sure to have a variety of screwdrivers and pliers on hand, as different locks may require specific types of tools.
Applying heat can be effective, particularly if the mechanism is made of metal, as it causes the metal to expand and can release the grip of the corrosion. Use a heat gun or a hairdryer, ensuring to avoid overheating and damaging other parts.
Considering replacement is a practical option if the mechanism is too corroded to be effectively removed or repaired. In such cases, purchasing a new lock or handle can save time and ensure security.
How Do You Reinstall a Lock Door Handle After Removal?
To reinstall a lock door handle after removal, follow these steps:
- Gather Necessary Tools: Before starting, ensure you have the right tools such as a screwdriver, a drill (if needed), and a replacement lock door handle if the old one is damaged.
- Align the Handle: Position the door handle assembly so that the spindle aligns with the hole in the door, ensuring that the locking mechanism is also aligned properly.
- Secure the Handle: Use screws to secure the handle in place, tightening them gently to avoid stripping the screws, and ensure the handle operates smoothly.
- Test the Lock Mechanism: After installation, test the lock and handle functionality to ensure they work as intended, making adjustments if necessary.
- Finish with Decorative Elements: Finally, if applicable, attach any decorative plates or covers to give the door a finished look and hide any visible screws.
Gathering the necessary tools is crucial for a smooth installation process, as having everything on hand minimizes frustration and time spent searching for items. Common tools include a Phillips or flathead screwdriver, and sometimes a power drill may be required for pilot holes or anchor screws.
Aligning the handle correctly is essential to ensure that the locking mechanism functions properly. The spindle that connects the exterior and interior handles must fit snugly into the corresponding holes without obstruction from the door materials.
Securing the handle involves fastening screws that hold the handle assembly in place; it’s important to use the right length screws to avoid damaging the door or the handle itself. Care should be taken to tighten them enough for stability while being cautious not to over-tighten, which can cause damage.
Testing the lock mechanism after installation ensures that the lock engages and disengages smoothly, confirming that the handle is functioning correctly. This step is vital to ensure that the door is secure and operates as expected.
Finally, adding decorative elements like cover plates can enhance the door’s appearance and conceal any screws or installation imperfections, providing a more polished and professional look to your door handle installation.
What are the Best Practices for Long-Term Maintenance of Lock Door Handles?
Best practices for long-term maintenance of lock door handles include the following:
- Regular Cleaning: Keeping door handles clean is crucial for maintaining their functionality and appearance. Use a soft cloth and mild soap solution to wipe down handles, ensuring to remove any dirt, grime, or oils that can accumulate over time.
- Lubrication: Periodically lubricate the moving parts of the door handle mechanism with a suitable lubricant, such as graphite or silicone spray. This helps to prevent sticking and ensures smooth operation, prolonging the lifespan of the handle.
- Check for Wear and Tear: Regularly inspect door handles for any signs of damage or wear, such as loose screws or corrosion. Addressing these issues promptly can prevent further deterioration and ensure the handle continues to function properly.
- Tightening Hardware: Over time, the screws and fixtures holding the door handle in place may loosen. Periodically check and tighten these screws to maintain stability and security in the handle’s operation.
- Environmental Considerations: Be mindful of the environment where the door handles are situated. For exterior handles, consider using weather-resistant materials and finishes that can withstand exposure to the elements, minimizing the need for frequent replacements.
- Prompt Repairs: If a door handle becomes stiff or difficult to operate, address the issue immediately. Delaying repairs can lead to more significant issues that may require more extensive maintenance or even complete replacement of the handle.