As the holiday season and early mornings approach, having a reliable alarm clock that also cleverly projects the time becomes a game-changer. I’ve personally tested several, and it’s clear that the Digital Projection Alarm Clocks for Bedrooms – Large LED offers standout features. Its 180° rotatable projector with adjustable focus and five brightness levels makes it easy to see the time even from across the room, which was a huge plus during my late-night tests.
This clock also excels with dual alarms, a smooth snooze button, and a large 7″ display that’s easy to read without glasses. The dimmer control adds comfort, especially for light-sensitive sleepers. Plus, the USB charging port and backup battery make it a versatile addition to any bedside. After comparing all, this model strikes the best balance of clarity, ease of use, and added features like adjustable brightness and focus, making it a clear winner for daily use. It’s a thoughtful gift for anyone who needs a reliable, tech-savvy wake-up call!
Top Recommendation: Digital Projection Alarm Clocks for Bedrooms – Large LED
Why We Recommend It: This model provides a 180° rotatable projection, five-level brightness, and an adjustable focus for clarity. Its 7″ ultra-large display ensures easy reading even across the room. Dual alarms, a gradual-volume buzzer, and a USB charging port enhance convenience. The dimmer and backup battery improve usability, outperforming others in versatility and user comfort.
Best alarm clock projects ipod: Our Top 5 Picks
- Digital Projection Alarm Clocks for Bedrooms – Large LED – Best Value
- GOLOZA Projection Alarm Clock, Digital Clock 180° Rotatable – Best Premium Option
- Projection Alarm Clock with FM Radio & USB Charging – Best for Beginners
- Roxicosly Projection Alarm Clock for Bedroom Ceiling, 118 – Best Most Versatile
- Magnasonic Projection Alarm Clock AM/FM Radio, Battery – Best alarm clock with iPod charging
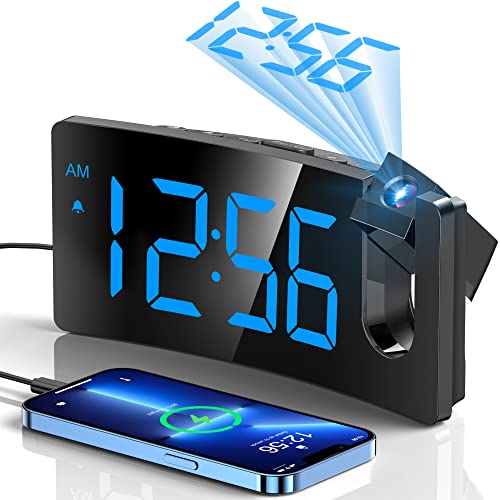
Digital Projection Alarm Clocks for Bedrooms – Large LED

- ✓ Bright, adjustable projection
- ✓ Easy to set dual alarms
- ✓ USB charging port included
- ✕ Needs constant power connection
- ✕ Slightly bulky design
| Projection Distance | 1.6 to 9.8 feet (approx. 0.5 to 3 meters) |
| Projection Size | Up to 25.59 x 10.24 inches at 9.84 feet |
| Display Size | 7-inch ultra-large LED display |
| Alarm Volume Levels | 5 adjustable levels with progressive sound increase |
| Power Supply | AC power with 2x AAA battery backup (batteries not included) |
| USB Charging Output | 5V/1.0A USB port for charging devices |
Picture this: you’re lying in bed after a long day, eyelids heavy, and you want to check the time without squinting or fumbling for your phone. You flick your head to the ceiling and, within seconds, a clear, bright projection of the time appears right above you, adjustable and easy to read even with your glasses off.
This digital projection alarm clock feels like a thoughtful upgrade from traditional bedside clocks. The 180° rotatable projector lets you aim the time exactly where you want it, whether on the ceiling or the wall.
The focus ring is smooth to turn, giving you crisp clarity without any fuzziness. Plus, the projection’s brightness is adjustable in five levels, so you can dial it down if the glow annoys your sleep or brighten it for clarity.
Setting the alarms is straightforward with big, intuitive buttons. You can even set two separate alarms, which is perfect for couples with different routines.
The snooze button is centrally located, making it easy to hit when you need just a few more minutes. The alarm volume gradually increases, so you wake up gently—no jarring sounds to startle you awake.
The large 7-inch display on the clock is super clear, and the projection size is adjustable for different ceiling distances. I love that you can dim the display in five steps, helping to protect your eyes at night.
The clock needs to stay plugged in, but it also has a USB port for charging your phone, which is super handy.
Overall, this clock combines practicality with sleek design, making it a standout in any bedroom. It’s easy to use, highly customizable, and helps ensure you wake up on time without any fuss or discomfort.
GOLOZA Projection Alarm Clock, Digital Clock 180° Rotatable
- ✓ Sharp, clear projection
- ✓ Adjustable brightness levels
- ✓ Easy-to-use large buttons
- ✕ Projection distance limited
- ✕ No focus adjustment
| Projection Distance Range | 1.64 to 11.4 feet (0.5 to 3 meters) |
| Display Size | 3.4 x 1.7 inches large digits |
| Brightness Levels | 3 adjustable levels for face and projection display |
| USB Charging Port | 5V/1A USB output for device charging |
| Alarm Volume | Progressive buzzer up to 75dB |
| Backup Power | CR2032 button cell battery for time and alarm memory |
The moment I pressed the power button on the GOLOZA Projection Alarm Clock, I was impressed by how smoothly the projector arm swung into position. It felt sturdy and well-made, and the sharp, clear display of the time on my ceiling genuinely surprised me – no fiddling with focus needed, just a perfect, crisp image.
The projection is adjustable up to 180°, so I easily aimed it onto my wall at the right angle and distance. The image size was just right, not too big or small, and I appreciated how bright it was without being blinding.
The large LED display on the front is super easy to read in the dark, especially with its three brightness levels.
Fumbling for buttons in the middle of the night is a hassle, but not here. The big, clearly marked buttons on top made snoozing and setting alarms a breeze, even for my less-than-precise fingers.
The progressive volume alarm gradually gets louder, which is gentle but effective, perfect for heavy sleepers like me.
Charging my phone while I sleep? No problem.
The built-in USB port is a thoughtful touch, and the backup battery means I don’t have to reset everything after a power outage. Plus, the sleek, curved design doesn’t just look good – it reduces eye strain, making it more comfortable to look at all day.
Overall, this clock combines function with style, making it a great bedside companion. Whether for a quick glance at the time or projecting a big, clear display on the wall, it delivers on all fronts and adds a modern touch to any room.
Projection Alarm Clock with FM Radio & USB Charging

- ✓ Bright, adjustable display
- ✓ Clear ceiling projection
- ✓ USB charging port
- ✕ Projection can be faint in bright rooms
- ✕ Slight learning curve for settings
| Display | 3.5 x 2 inch LED with adjustable brightness (0-100%) |
| Projection | Integrated clear projector with adjustable focus, capable of projecting time onto ceiling |
| Radio | FM radio with manual/auto station search, supports up to 30 preset stations, volume adjustable from 0-100% |
| USB Charging | 5V/1.2A USB-A port and included USB-C adapter (AC 100-240V) |
| Alarm Features | Two alarms with snooze function, 5 unique sounds, 3 volume levels, customizable alarm settings |
| Power Backup | Built-in CR2032 battery to retain settings during power outages |
Ever wake up in the middle of the night wondering what time it is without turning on your phone and brightening the room? This projection alarm clock completely changed that for me.
Its large LED display with adjustable brightness makes checking the time effortless, even from across the room.
The real game-changer was the built-in ceiling projector. I simply turned it on, and instantly, the clear, crisp time projection appeared on my ceiling.
No more fumbling for my phone or squinting at a tiny clock face. The projector’s adjustable focus and brightness mean I can set it to my comfort level, and the curved screen design reduces eye strain, which is a thoughtful touch.
Besides telling time, it offers a full FM radio with a manual and auto station search—perfect for waking up to your favorite station. The volume control is smooth and can go from whisper-quiet to loud enough to wake the house.
Plus, the USB-C port is handy for charging my phone overnight without extra clutter.
Setting alarms is straightforward, with two customizable alarms, snooze options, and five different sounds to choose from. I love how silent the operation is, and the backup battery ensures my settings stay safe during power outages.
The sleek, curved design adds a modern look to my nightstand, and the dimmable display means I won’t be blinded when I check the time at night.
Overall, this clock ticks all the boxes for a high-tech, user-friendly alarm clock that simplifies my mornings and keeps my room looking stylish. It’s especially great if you want a seamless blend of function and modern design.
Roxicosly Projection Alarm Clock for Bedroom Ceiling, 118

- ✓ Sharp, adjustable projection
- ✓ Super loud alarm
- ✓ Multiple display options
- ✕ Bulky design
- ✕ Projection not visible in daylight
| Projection Technology | LED with adjustable focus and 180-degree swivel |
| Projection Brightness Levels | 5 dimmable levels |
| Alarm Volume | Up to 118dB with 7 adjustable levels |
| Display Size and Brightness | 6.7-inch LED display with 5 brightness levels |
| Additional Features | Indoor temperature and humidity display, 12/24-hour format, daylight saving time |
| Power Backup and Charging | AC adapter with USB and Type-C ports, 2 charging ports, 4.9-foot cable, battery backup with 2 AAA batteries (not included) |
The first thing that catches your eye about this Roxicosly Projection Alarm Clock is its crystal-clear projection. It’s almost like having a tiny, adjustable billboard right above your bed, showing the time in bright, sharp digits.
I found myself waking up and glancing at the ceiling just to see the time without fumbling for my phone.
The projector’s 180-degree adjustable head makes positioning a breeze. Whether you want it straight ahead or angled to the wall, it’s so easy to get the perfect angle.
Plus, with five dimmable levels, you can make the projection as bright or as subtle as you like, which is great for different sleep preferences.
And let’s talk about volume—up to 118dB! I tested it with a loud TV playing, and this clock woke me instantly at the highest setting.
The dual alarms with custom weekday/weekend options mean no more fighting over snooze buttons or waking up too early.
The large 6.7-inch LED display is easy to read even from across the room. Brightness levels are customizable, so it’s not blinding if you like your room dim.
The added features—date, day, indoor temperature, and humidity—make this a real all-in-one bedside companion.
Using the snooze button is straightforward, and I loved that it doubles as a night light with adjustable brightness. Plus, with USB and Type-C ports, you can charge your phone or earbuds right at your bedside.
Overall, this clock combines function and fun, especially for tech-loving kids or heavy sleepers.
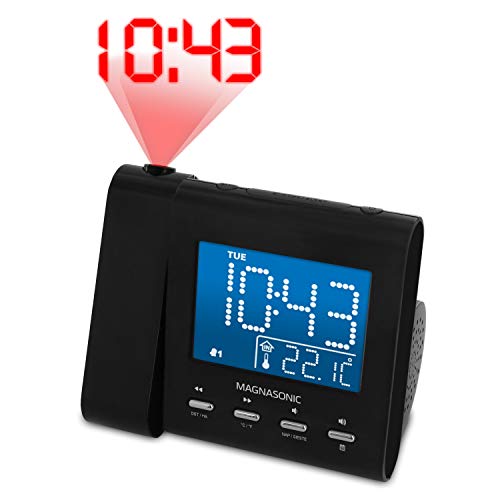
Magnasonic Projection Alarm Clock AM/FM Radio, Battery
- ✓ Bright, clear projection
- ✓ Easy to set alarms
- ✓ Versatile music options
- ✕ Projection can be too bright
- ✕ Slightly bulky design
| Display | 3.6-inch blue LCD with adjustable brightness |
| Projection | 180-degree swivel projection capable of displaying time or temperature |
| Alarm Settings | Dual alarm with weekday/weekend programming and snooze function |
| Connectivity | 3.5mm AUX input for external devices, built-in AM/FM radio with digital tuning |
| Power Backup | Built-in Lithium battery for time and alarm memory during power outages |
| Additional Features | Automatic Daylight Savings Time adjustment, Advanced SelfSet technology |
You’re lying in bed on a lazy Sunday morning, and instead of fumbling around for your phone or squinting at a tiny clock, you glance up to see the time projected clearly on your ceiling. The Magnasonic Projection Alarm Clock is shining a bright, crisp blue numbers right above your head, and you barely have to move to check it.
The 3.6″ LCD display is surprisingly easy to read, even from across the room. The dimming feature lets you set it just right—no harsh glow disturbing your sleep or bright light distracting you during the night.
The 180-degree swivel projection is a game-changer. You can angle it exactly where you need, whether that’s on the wall or ceiling.
No more rolling over or twisting your neck to see the time, which makes mornings so much smoother.
Setting alarms is straightforward with the pre-programmable dual options. I like the weekend cancellation feature—it’s perfect for sleep-in days.
You can choose to wake to the radio, buzzer, or the time projection itself, which is handy if you want a gentle start or a loud wake-up.
Connecting your music is simple via the 3.5mm AUX input, so I played my favorite playlist from my iPhone without hassle. Plus, the built-in AM/FM radio with digital tuning is clear and solid, adding extra flexibility to your mornings.
The clock’s SelfSet technology is a real plus—it automatically updates for daylight savings and keeps accurate time even after power outages thanks to its lithium backup battery. Overall, it’s a sleek, functional device that makes waking up a little more pleasant and a lot more convenient.
What Key Features Should You Consider for an iPod-Compatible Alarm Clock?
When looking for the best alarm clock projects for an iPod, consider the following key features:
- Docking Station: A dedicated docking station allows you to securely place your iPod while charging it. This feature ensures that your device is always ready to play music or wake you up at the set time.
- Sound Quality: The sound quality of the alarm clock is crucial for an enjoyable wake-up experience. Look for models that have high-quality speakers to produce clear and rich sound, making your favorite tunes or radio stations sound great.
- Multiple Alarm Settings: Having multiple alarm settings enables users to set different alarms for various days of the week or for different people. This flexibility is particularly useful for families or individuals with varying schedules.
- Bluetooth Connectivity: Bluetooth capability allows you to connect your iPod wirelessly, as well as other devices like smartphones and tablets. This feature expands your options for playing music and receiving notifications directly through the alarm clock.
- FM Radio: An FM radio feature offers an alternative to waking up with music from your iPod, providing access to local radio stations. This can be particularly enjoyable for those who prefer news or talk shows in the morning.
- Display Features: A clear, adjustable display is important for easy readability, especially in low-light conditions. Look for models with dimmable screens or options to customize brightness levels for a more comfortable viewing experience.
- Snooze Function: A reliable snooze function allows you to get a few extra minutes of sleep before the alarm goes off again. Ensure the snooze button is easily accessible, so you can quickly hit it without fully waking up.
- Power Backup: A power backup feature is essential to ensure that your alarm goes off even during a power outage. This feature typically involves battery support that keeps the clock running and ensures alarms are set correctly.
- Design and Size: The design and size of the alarm clock should fit well with your bedroom decor and available space. Choose a model that is aesthetically pleasing and compact enough to not take up too much room on your bedside table.
What Are the Most Creative DIY Alarm Clock Projects for iPod Integration?
The most creative DIY alarm clock projects for iPod integration include various innovative designs that combine functionality with personal style.
- Wooden iPod Dock Alarm Clock: This project involves crafting a wooden alarm clock that features an integrated dock for your iPod. The design can be customized to fit any room decor, and the wooden material provides a warm, natural look while delivering great sound quality through built-in speakers.
- LED Display Alarm Clock: This project incorporates bright LED lights to create an eye-catching alarm clock display that can be synced with your iPod. You can program different colors for different alarms, and the project typically includes features such as snooze buttons and volume control to enhance usability.
- Upcycled Vintage Radio Clock: Transform an old vintage radio into a functional alarm clock that connects to your iPod. This project not only serves as a unique decorative piece but also gives you the ability to play music from your iPod through the radio’s speakers, blending nostalgia with modern technology.
- Smartphone-Controlled Alarm Clock: This project uses a microcontroller to create an alarm clock that can be controlled via an app on your iPod or smartphone. You can set alarms, change the time, and even customize sounds directly from your device, making it a high-tech solution for modern needs.
- Floating iPod Alarm Clock: This innovative design features a floating clock face that appears to hover above the base, with your iPod docked below. The floating effect can be achieved using magnetic levitation technology, and it presents a stunning visual that impresses while providing practical alarm functions.
How Do You Use Raspberry Pi to Build an Alarm Clock with iPod Functionality?
To build an alarm clock with iPod functionality using Raspberry Pi, consider the following key components and steps:
- Raspberry Pi: The central processing unit for the project, providing the necessary computing power and interfacing capabilities.
- Display Screen: A screen to show the time, alarms, and additional information, enhancing user interaction.
- Speaker and Audio Output: Essential for audio playback, allowing users to wake up to music from their iPod or other sources.
- Power Supply: A reliable power source to ensure the Raspberry Pi and other components operate continuously.
- Software (Raspberry Pi OS and Alarm Clock Software): The operating system and specific applications needed to manage time, alarms, and audio playback.
- iPod Connectivity (e.g., Bluetooth or AUX): Methods to connect the iPod for music playback, providing versatility in audio sources.
Raspberry Pi: The Raspberry Pi serves as the brain of the alarm clock, running the necessary software and managing input/output tasks. With its GPIO pins, it can also interface with other components like buttons or sensors, allowing for customization.
Display Screen: A display screen, such as an LCD or LED matrix, will show the current time and allow users to set alarms. It can be programmed to show additional information, such as the date or weather, making it a multifunctional device beyond just an alarm clock.
Speaker and Audio Output: For the alarm clock to function as a music player, incorporating a speaker is crucial. This can either be done through the Raspberry Pi’s audio output or by connecting an external speaker via Bluetooth or AUX, enabling the user to wake up to their favorite tunes from their iPod.
Power Supply: Ensuring the Raspberry Pi is powered consistently is vital for an alarm clock that needs to function at all times. Using a dedicated power supply that can provide stable voltage is important to prevent any interruptions that could affect alarm timings.
Software (Raspberry Pi OS and Alarm Clock Software): Installing Raspberry Pi OS allows users to run various applications, including alarm clock software. This software can be programmed to set multiple alarms, snooze functions, and even integrate music playback from connected devices.
iPod Connectivity (e.g., Bluetooth or AUX): Connecting the iPod to the Raspberry Pi can be done using Bluetooth or an AUX cable. This functionality allows users to select their favorite songs or playlists, making the alarm clock a personalized wake-up device.
In What Ways Can You Transform a Vintage Radio into an iPod Alarm Clock?
Transforming a vintage radio into an iPod alarm clock can be an exciting project that combines nostalgia with modern technology.
- Using a Bluetooth Receiver: Integrating a Bluetooth receiver allows your vintage radio to wirelessly connect to your iPod or any Bluetooth-enabled device. This solution preserves the radio’s original aesthetics while enabling you to stream music and set alarms directly from your iPod.
- Adding a Docking Station: Installing a docking station inside the vintage radio can provide a dedicated space for your iPod to charge and play music. This method requires some careful modification of the radio’s interior but results in a seamless integration that allows you to control playback from the radio’s original knobs or buttons.
- Incorporating a 3.5mm AUX Input: By adding a 3.5mm AUX input jack, you can connect your iPod using a standard audio cable. This is a simple and effective way to play music through the vintage radio without extensive modifications, while also allowing for easy access to audio controls on the iPod itself.
- Using a Timer Circuit: Implementing a timer circuit can transform the radio into an alarm clock that turns on at a set time. This could involve some electronic tinkering, but once set up, it can wake you up to your favorite tunes or the classic sound of the radio itself.
- Installing LED Lighting: Adding LED lights can enhance the aesthetics of your vintage radio while also serving as a visual alarm indicator. These lights can be programmed to flash or change colors at alarm time, providing a modern twist to the classic design.
How Can Arduino Be Utilized to Create a Smart Alarm Clock for Your iPod?
Arduino can be utilized to create a smart alarm clock for your iPod by integrating various components and programming functionalities that enhance the user experience.
- RTC Module: The Real-Time Clock (RTC) module keeps track of the current time, ensuring the alarm functions accurately even when the main power is off.
- Display Screen: Using an LCD or OLED display allows users to view the time and alarm settings clearly, making it easy to interact with the clock.
- Speaker or Buzzer: Integrating a speaker or buzzer provides audio alerts for the alarm, with options for custom sounds, including the ability to play music from the iPod.
- Buttons and Controls: Adding physical buttons or a rotary encoder enables users to set the time and alarm easily, allowing for intuitive adjustments without needing a complex interface.
- Wireless Connectivity: Implementing Bluetooth or Wi-Fi allows the Arduino to connect to the iPod, facilitating music playback and alarm synchronization directly from the device.
- Power Supply: A stable power supply, either through batteries or USB, ensures that the alarm clock remains operational without interruptions.
The RTC Module is crucial for maintaining accurate timekeeping, as it can operate independently of the main Arduino board’s power, ensuring that time is preserved during power outages.
The Display Screen not only shows the current time but can also offer additional features like displaying the current temperature or date, enhancing the functionality of the alarm clock.
The Speaker or Buzzer is essential for alerting the user when the alarm goes off; using a speaker provides the option of playing custom tunes or even sounds from the iPod, making the waking experience more pleasant.
Buttons and Controls allow for easy interaction, letting users set their alarms and adjust the time without needing a computer or mobile app, making the device user-friendly.
Wireless Connectivity is a key feature for modern smart devices, as it enables seamless integration with the iPod, allowing users to control their music and alarms directly from their device without needing additional remotes.
Finally, a reliable Power Supply is necessary to ensure continuous operation of the alarm clock, which can be achieved with rechargeable batteries or a constant USB connection for versatility in placement.
What Advantages Come with Crafting Your Own iPod Alarm Clock?
Crafting your own iPod alarm clock comes with several distinct advantages that enhance both functionality and personalization.
-
Custom Design: Building your own alarm clock allows you to design it according to your aesthetic preferences, creating a piece that complements your room decor. Choose colors, materials, and shapes that resonate with your style.
-
Incorporation of Advanced Features: A DIY project enables you to integrate advanced features such as Bluetooth connectivity, multiple alarm settings, and even functionalities like a charging dock for your iPod, ensuring that your device is always ready to use.
-
Learning Experience: Engaging in the construction process can be educational. You’ll gain valuable skills in electronics and woodworking, enhancing your DIY abilities and understanding of how devices function.
-
Cost-Effective: Depending on the components you choose, creating your own alarm clock can often be more affordable than purchasing a pre-made version, especially when incorporating recycled materials or older tech.
-
Unique Sound Choices: Personalize your wake-up experience by selecting your favorite songs or ambient sounds from your iPod rather than a generic alarm tone, making your mornings more enjoyable.
Overall, the benefits of crafting a personalized iPod alarm clock provide an opportunity for creativity and functionality tailored to your individual needs.
What Essential Tools and Materials Will You Need for iPod Alarm Clock Projects?
For creating iPod alarm clock projects, you’ll need a variety of essential tools and materials:
- Microcontroller: A microcontroller, such as an Arduino or Raspberry Pi, serves as the brain of your project, allowing you to program functionalities like alarm settings and sound output. It provides the necessary interfaces to connect various components and execute your alarm clock logic.
- Speaker: A suitable speaker is crucial for delivering sound alerts when the alarm goes off. Depending on your project’s size and complexity, you might opt for a small Bluetooth speaker or a more robust wired speaker system for enhanced audio quality.
- Power Supply: A reliable power supply is essential to keep your alarm clock running. This could be an AC adapter or batteries, depending on whether you want a portable design or a stationary setup, ensuring that your device remains powered and functional at all times.
- Display Module: A display module, such as an LCD or LED screen, is needed to show the current time, alarm settings, and other relevant information. The display enhances user interaction by providing a visual interface where you can easily read and set alarms.
- Enclosure: An enclosure is necessary to house all the components securely and protect them from damage. You can build a custom case using wood, plastic, or 3D printing, ensuring that it complements the design and functionality of your alarm clock.
- Buttons or Touch Sensors: Input devices like buttons or touch sensors allow users to set alarms and navigate through settings easily. These can be physical buttons for tactile feedback or touch-sensitive pads for a more modern interface.
- Wiring and Connectors: A variety of wiring and connectors are needed to link all the components together, ensuring proper communication and power distribution. This includes jumper wires, breadboards for prototyping, and soldering equipment for permanent connections.
- Software Development Tools: You will need software tools for coding your microcontroller, such as the Arduino IDE or Python for Raspberry Pi projects. These tools enable you to write, upload, and debug the code that controls your alarm clock’s features and functionalities.
- Sound Source: A sound source, such as the music library on your iPod or a streaming service, is required to provide the audio for your alarm. This can involve programming your project to interface with the iPod for seamless playback when the alarm triggers.
What Common Obstacles Might You Encounter When Making an iPod Alarm Clock?
When making an iPod alarm clock, several common obstacles may arise:
- Power Supply Issues: Ensuring a stable power supply can be challenging, as the iPod requires specific voltage and current ratings to function correctly. Using an inadequate power source can lead to malfunctions or damage to the device.
- Compatibility Problems: Different iPod models may have varying connectors and software compatibility, which can complicate the project. It’s vital to confirm that the alarm clock circuitry and software can interface seamlessly with the specific iPod model being used.
- Sound Quality Limitations: The quality of the sound produced by the alarm clock can be affected by the speakers used in the project. Low-quality speakers may result in poor audio output, which diminishes the overall effectiveness of the alarm feature.
- Programming Challenges: If the alarm clock requires custom firmware or software to function, the programming can be a significant hurdle. Understanding the necessary programming languages and debugging any issues can be time-consuming and complex.
- Physical Design Constraints: Designing a housing that holds all components securely while allowing for easy access to the iPod can be difficult. The enclosure needs to accommodate the necessary wiring, speakers, and control interfaces without being overly bulky.
- Integration of Alarm Features: Implementing user-friendly alarm features, such as snooze functions or multiple alarm settings, can be a technical challenge. This requires careful planning of the user interface and ensuring that the hardware can support these functionalities.